The new LMT Kanban board for field service!
Much missed, desired and requested: The lead management table can now be displayed as a Kanban board. The new view will go live at the end of calendar week CW 20 2024. Administrators will receive a new right for the setting options.
We remember that the quick menu (cogwheel) in the lead management table (LMT) as a so-called "quick function" did its job well and served the sales force well. Now is the time, after the constant feature development, to get a better visualization in the system and to simplify the user guidance.
With the new Kanban board, you can see at a glance how many leads are in which status. In addition, each tile has shortcuts to call up views and functions. We will be adding further features to the LMT Kanban board.
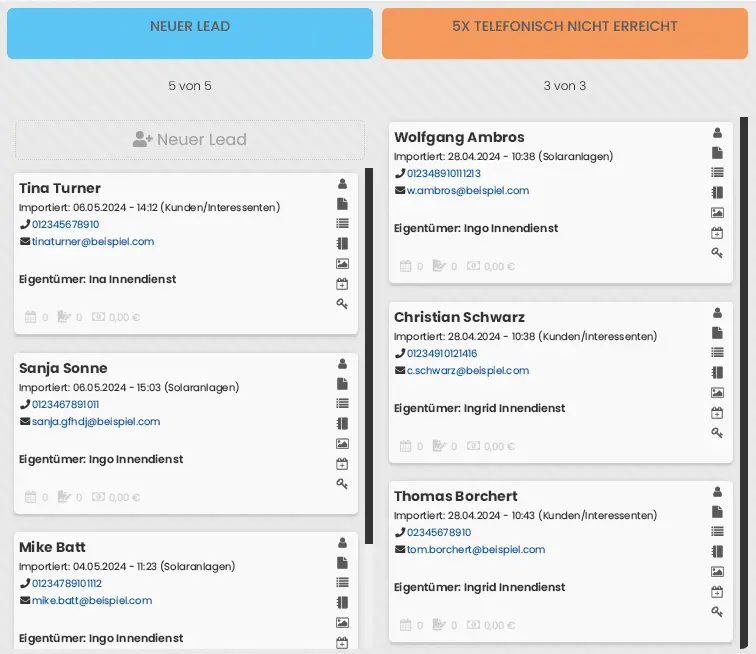
The overview

There is now a new entry on the left-hand side of the menu called "LMT Kanban".
Almost any column can be displayed on the Kanban board. This is automatically structured according to the lead status you have set. Starting with "New lead", "Appointment made", "Quote created" and so on, leads can now move from left to right through the defined columns. The columns are created from the "Active lead statuses", which can be found in Project management -> Overview -> Active lead statuses. There are no fixed columns (defined by LEVETO). All active lead statuses are displayed as a column in the LMT Kanban board, the tiles can be moved manually. Of course, monitoring is running in the background to ensure that a new lead cannot be moved to the Offer status because no offer has been generated via LEVETO. It is possible to drag and drop a tile from column to column. This changes the status of the lead.
When the LMT Kanban board is finished, the process system, i.e. the workflows, continues (ToDo list).
The tiles
Each lead is displayed as a separate tile. A lead can only be in one column. This tile provides some information about the lead directly:
- First name and last name
- Import date with date and time
- the group in which the lead is located
- Telephone numbers
- E-mail address
- Assigned consultant titled as "owner"
- Date of a (consultation) appointment with this lead. The next future appointment is displayed?
- Number of all offers created
- Order value of all offers made
It is possible to display warnings for leads. By default, the "New lead" column is set so that a red note with the word "Overdue" is displayed on the left-hand side of the tile if the lead is older than two days. This means that it has not changed to a different lead status for more than two days.
Warnings can also be displayed in the other columns. For these, you can freely set how long a lead may remain in this lead status.

The icons
The three icons at the bottom left appear light gray as long as they have no entry. They turn dark gray as soon as data can be displayed there.
If you hover over one of these three icons with the mouse pointer, an interactive "tooltip" is displayed. These tooltips can be used to display the overview of the appointments or the overview of the offers in an overlay in front of the Kanban board. In addition to the overview table, the tooltip can also be used to create an appointment in the calendar view or open the quotation editor. Both the overview and the quotation editor are displayed in an overlay above the Kanban board. It is no longer necessary to switch to the CRM area.
There are also seven icons on the right-hand side of each tile. These are shortcuts to several areas:
- Male - switch to CRM
- folded paper - switch to the questionnaire
- three lines - switch to the field service recording sheet
- Notebook - Show notes for the lead. All notes for this lead open in an overlay in front of the Kanban view. New notes can be added.
- Image mountains with sun - Show the media library of the lead. The media library for this lead opens in an overlay in front of the Kanban view.
- Calendar with plus sign - Create a new resubmission. The window for this opens in an overlay in front of the Kanban view.
- Key - Create/renew access data for the end customer portal.
The map view
If you click on the address, the route view opens in an overlay. The address of the starting point and destination are displayed and you can view the route on a map.

The offer overview
You can display the usual quotation list from the CRM area, including a drop-down menu. The quotation editor can also be opened from the Kanban board.
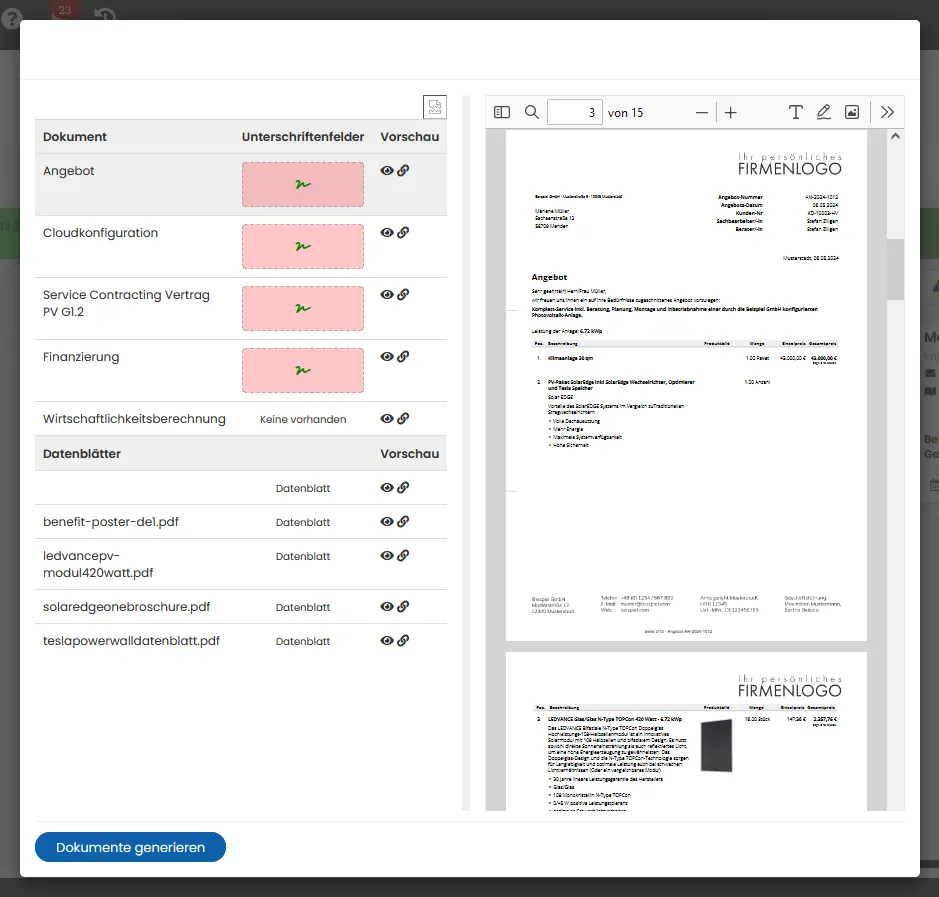
If you open the quotation overview and click on one of the three red numbers, the document overview is displayed. On the left are the documents associated with the offer. At the top are the documents that require a signature.
If you click on the eye icon, the document is displayed in the preview field on the right. If you click on the chain icon, the document is opened in a new tab.
You can call up the signature field from here and obtain a signature. If there are no signatures, the field is colored slightly red. If a signature has been saved, the signature field is white.
All data sheets associated with the offer are listed in the lower section.
.

Subject: